Getting started
This page will let you know all about what an installation enviroment is, how to set it up and how to use it to get started.
What is an installation environment?
An installation environment, also known as a live ISO is exactly what the name suggests - an environment for installing a linux distribution, in this case - Gentoo.

Most linux distributions ship their own installation environment (LiveISO) and Gentoo is no different, however I'd advise against using the one, provided by Gentoo. It makes the installation process unnecessarily difficult by not having a desktop environment.

Gentoo can be installed using any other linux distribution's installation environment, most of which have a nice pre-configured desktop that makes the whole installation process a lot less annoying by allowing you to copy-paste long commands and to do something else while waiting for it to finish.

For this guide, I'll be using a Linux Mint live ISO, however as mentioned previously, pretty much any other distribution's live ISO should also get the job done.
Downloading and setting up the installation environment
Before beginning, you are gonna need a few things:

  • 1. USB drive with a capacity of 4GB or more.
  • 2. Access to the internet.
  • 3. A few spare hours.
  • I'm gonna assume that anyone who's gotten to this point already knows how to flash an ISO to a flash drive and boot from it, however I am still gonna mention Ventoy, because it's cool.

    Now that you've booted off your chosen distro's live ISO, it's time to actually install Gentoo, starting with:
    Getting the partitions ready
    Yeah, this part is all about disks and partitions.
    Choosing a disk
    Before doing any partitioning, you firstly need to choose a disk to be partitioned. There are no strict restrictions about what disk should be used, however it is generally recommended to install any operating system on an SSD, instead of an HDD.

    To check the names of all disks, currently connected to your system, use:
    ~

    $

    fdisk -l
    SATA disks should appear as /dev/sd*, NVME disks should appear as /dev/nvme*n*.

    Attention: A virtual disk (/dev/vda) will be used in all examples, make sure to replace that with your chosen disk, wherever necessary.

    Figuring out what partitions are actually needed
    There is a slight catch that needs to be taken care of, before proceeding with partitioning the disk. That being whether your system is Legacy BIOS or UEFI, as the following steps differ slightly for each one. If you are unsure about your system, you can type the following command:
    ~

    $

    ls /sys/firmware/efi
    If the command errors out, your system is legacy BIOS and if it doesn't, it's UEFI.
    Setting up partitions
    For the following steps, you can use whichever disk management program you want (e.g. gparted, GNOME disks, etc), cfdisk will be used for the demonstration.

    1st, wipe the existing partition table on the chosen disk:

    ~

    #

    wipefs -a /dev/<disk>

    Attention: This action WILL delete *ALL* data on the selected disk and is NOT reversible! Proceed with caution!

    Note: These steps aren't *strictly* necessary, as it is possible to resize an existing partition and do the following steps alongside it, however resizing a partition is a notoriously janky process and could result in lost data. Proceed with caution either way!

    After that, depending on whether your computer is legacy BIOS or UEFI, you're gonna have to set the disks up a little bit differently:

    - UEFI
    Set the partition table to GPT
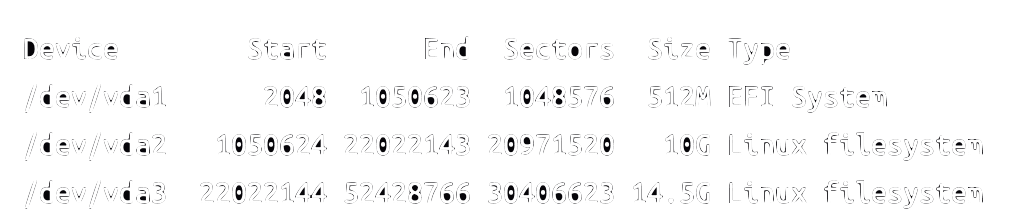
    Create 3 partitions:

  • 1. 512MB type: EFI system
  • 2. If possible, at least 30GB, type: Linux filesystem, (root)
  • 3. If possible, least 50GB, type: Linux filesystem, (home) [optional]
  • Note: I've used partitions that are smaller than recommended in the example, as it's just there for demonstration purposes.

    - Legacy BIOS
    Set the partition table to MBR/DOS
    Create 2 partitions:

  • 1. If possible, at least 30GB, primary, type: Linux, (root)
  • 2. If possible, at least 50GB, primary, type: Linux, (home) [optional]
  • Set the partition you created for using as root to bootable
    But what about swap?

    Don't worry about it, we'll get there when we get there. (Check the setting up zram swap chapter for more info on that)

    Alright, now that you've made your partitions, it's time to format them appropriately.

    You have a choice to make with the file system you want to use, as each one has it's own unique advantages. Here are some of the more common file systems:

  • 1. ext4 - the default, use it if you just want your system to work.
  • 2. btrfs - a more modern option, offers file system level snapshots, in case something goes wrong.
  • 3. xfs - an alternative file system, sorta similar to ext4.
  • 4. bcachefs - an alternative, experimental file system, which offers similar advantages to btrfs. While it provides similar advantages, it operates completely differently from btrfs and any other file system.
  • Note: This guide is written with *ext4* in mind, though the steps should be mostly the same for all the other file systems, additional reading might be a good idea if you decide to use them, ESPECIALLY for *bcachefs*.

    Attention: Bcachefs requires at least Linux 6.7 to work.

    Now that you've chosen your file system, it's time to format your partitions with it. In the example case:

    - UEFI
    ~

    #

    mkfs.fat -F32 /dev/<EFI partition>
    ~

    #

    mkfs.ext4 /dev/<ROOT partition>
    ~

    #

    mkfs.ext4 /dev/<HOME partition>

    Attention: It is VERY important that your EFI System partition (/dev/vda1 in the example case) be formatted as FAT32!

    - Legacy BIOS
    ~

    #

    mkfs.ext4 /dev/<ROOT partition>
    ~

    #

    mkfs.ext4 /dev/<HOME partition>
    At this point, your disk's partition table should looks something like this:

    - UEFI
    ~

    $

    fdisk -l
    An image, showing the output of the fdisk command for UEFI devices
    - Legacy BIOS
    ~

    $

    fdisk -l
    An image, showing the output of the fdisk command for DOS devices
    Everything looks good? Now it's time to:
    Mount partitions and setup 'stage 3'
    Before going any further, you might wonder, what's a 'stage 3' ?

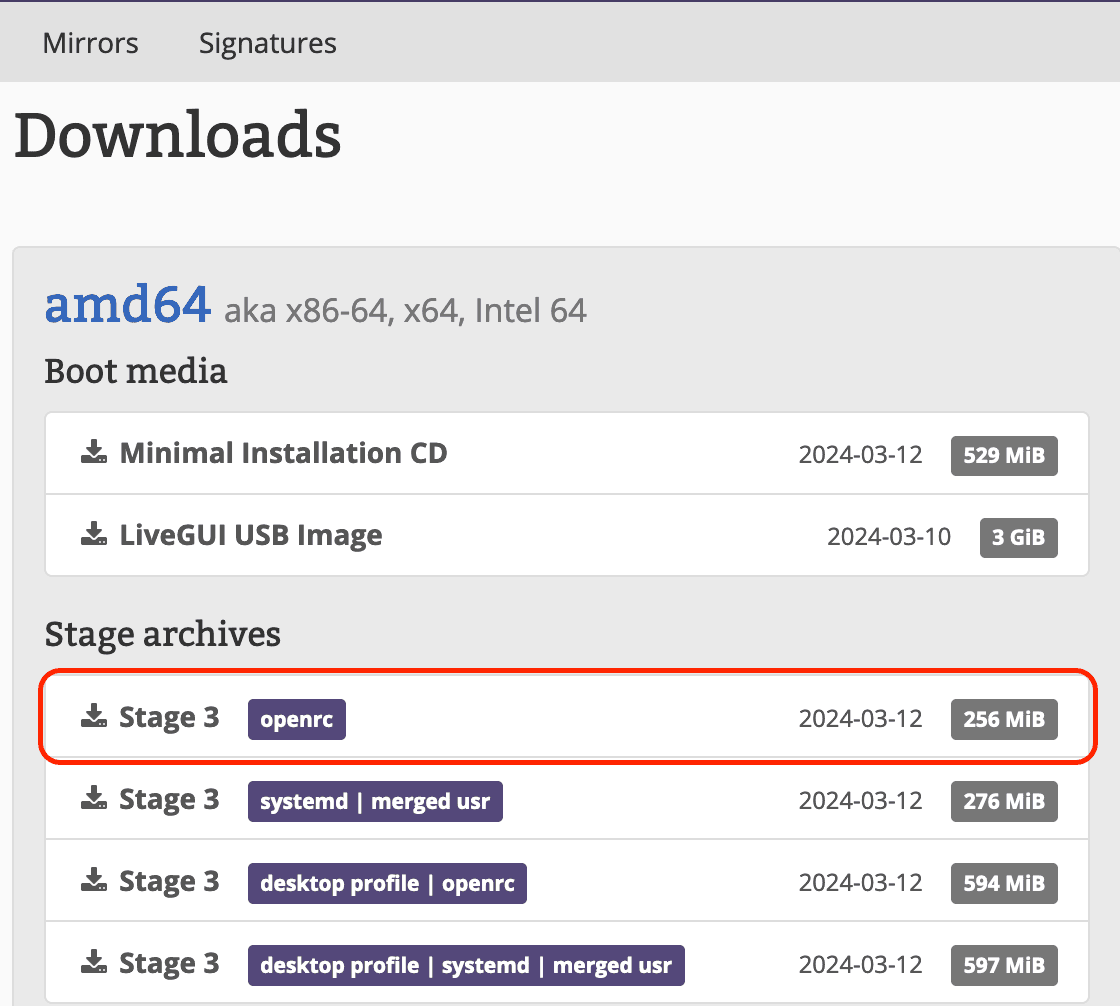
    A 'stage 3' is simply an archived, basic gentoo system, which needs to be extracted on a disk partition in order for anything useful to be done with it.

    Before any of that can be done, however, you need to mount your newly created partitions first. Here's how that's done:

    1st, create a root mount point:
    ~

    #

    mkdir /mnt/gentoo
    2nd, mount the root partition:
    ~

    #

    mount <Root Partition> /mnt/gentoo
    3rd, create the other mount points:
    ~

    #

    mkdir /mnt/gentoo/boot
    - If you have created a separate /home partition:
    ~

    #

    mkdir /mnt/gentoo/home
    4th, mount the other partitions:
    ~

    #

    mount <EFI partition> /mnt/gentoo/boot
    - If you have created a separate /home partition:
    ~

    #

    mount <Home partition> /mnt/gentoo/home
    - Wait, aren't these 'mount points' just directories?

    Yes! On linux, disk partitions are mounted as directories.

    Note: You should still create /mnt/gentoo/boot even if your system is not EFI.

    With all of that done, you are now ready to download the gentoo stage3

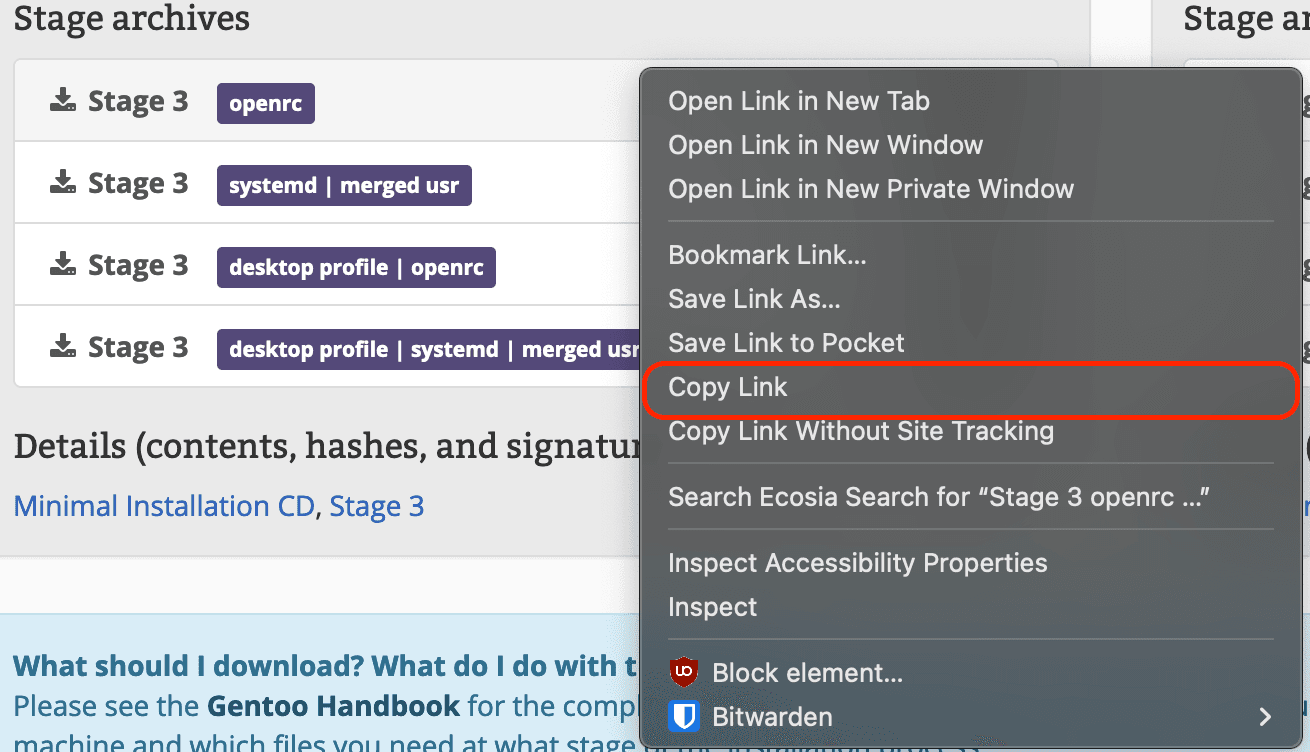
    1st, go to the Gentoo downloads page, then select which version of the gentoo base system you want. If the words 'systemd' and 'openrc' mean nothing to you or you can't choose between the two init systems, choose the 'openrc' option

    Something that isn't text
    Right click it and copy the link:
    Something that isn't text
    Then go to the /mnt/gentoo directory and download it there with wget

    /mnt/gentoo

    $

    wget <Copied URL>

    Note: Depending on your chosen Live ISO, you might need to download wget manually

    After the archive has finished downloading, extract it with tar

    /mnt/gentoo

    $

    tar -xvf `ls | grep stage3`
    The stage3 archive, as mentioned above contains a very basic gentoo system. You can check that for yourself by running ls
    /mnt/gentoo

    $

    ls
    An image showing the output of the ls command in the /mnt/gentoo directory
    With our partitions setup and our base system extracted
    We can now move to actually
    Attention: Gentoo.guide is still a WIP. The information, design and anything else related to the site is not final.
    I'm too lazy to make this banner better :P
    Gentoo.guide is fully FOSS! Check it out on: